Showing posts with label kali linux. Show all posts
I am simply teaching how Arp Spoof and Ettercap work.

What does ettercap do?

Well it does a lot of things but today we are going to show how a hacker can steal SSL encrypted passwords over wifi! SSL encrypted sites are like Gmail, Yahoo, Paypal etc! Anything with https:// in front of it. 

How does it do this you ask? Confused

It works by ARP Spoofing your Victims IP and when the site they visit tries to serve an SSL Cert ettercap injects it's own fake cert and captures the password! Brilliant! 

1. Let's get started!

 First scroll to your dolphin file browser. It is the little icon in the bottom that looks like a file cabnet.

Click on the root folder 

Then open the etc folder and scroll down until you find a file called "etter.conf"

scroll down until you see this:

#---------------
#     Linux
#---------------
# if you use ipchains:
   #redir_command_on = "ipchains -A input -i %iface -p tcp -s 0/0 -d 0/0 %port -j REDIRECT %rport"
   #redir_command_off = "ipchains -D input -i %iface -p tcp -s 0/0 -d 0/0 %port -j REDIRECT %rport"
# if you use iptables:
   redir_command_on = "iptables -t nat -A PREROUTING -i %iface -p tcp --dport %port -j REDIRECT --to-port %rport"
   redir_command_off = "iptables -t nat -D PREROUTING -i %iface -p tcp --dport %port -j REDIRECT --to-port %rport"

Now we need to remove 2 # symbols to allow the Redir command to work in iptables. Make yours looks like this:


Change this: 
# if you use iptables:
   #redir_command_on = "iptables -t nat -A PREROUTING -i %iface -p tcp --dport %port -j REDIRECT --to-port %rport"
   #redir_command_off = "iptables -t nat -D PREROUTING -i %iface -p tcp --dport %port -j REDIRECT --to-port %rport"

To This:
# if you use iptables:
   redir_command_on = "iptables -t nat -A PREROUTING -i %iface -p tcp --dport %port -j REDIRECT --to-port %rport"
   redir_command_off = "iptables -t nat -D PREROUTING -i %iface -p tcp --dport %port -j REDIRECT --to-port %rport"

Great now the two # symbols are deleted just close and save!

2. Let's Open Ettercap!

Click the backtrack logo on the bottom left -> backtrack tab -> privilege escalation -> protocol analysis-> network sniffers -> ettercap-gtk


3. Now click Sniff and select unified sniffing.

4. Select your Network interface. In my case it is wlan0 my wifi but yours may be diferent!

5. Now click the Host tab and Scan for hosts.

6. Now click the host tab and select the host list option.

7. Now it's time to select your targets from the host list! Select your router mine was 192.168.1.1 and add it to host 2.
Next select your victim mine was 192.168.1.6 and add it to host 1.

8. Next go to the Mitm tab and select arp poisoning and check the box for remote sniffing and click ok!


9. Click the Start button and then the Start Sniffing option.


NOTE THIS TUTORIAL IS FOR EDUCATIONAL PURPOSES ONLY!!! 

Posted on 8:06 AM by Unknown

13 comments


Unix is popular operating system, developed by AT&T in 1969 and it has been very important to the development of the Internet. It is a multi-processing, multi-user, family of operating systems that run on a variety of architechtures. UNIX allows more than one user to access a computer system at the same time. 


A widely used Open Source Unix-like operating system kernel. Linux was first released by its inventor Linus Torvalds in 1991. Combining the Linux kernel with the GNU software forms the basis of the operating system family generally known as 'Linux'. There are distributions of GNU/Linux for almost every available type of computer hardware from desktop machines to IBM mainframes. The inner workings of GNU/Linux are open and available for anyone to examine and change as long as they make their changes available to the public, as set out in the terms of the GNU General Public License. Because of its robustness and availability, Linux has won popularity in the Open Source community as well as among commercial application developers. 

Unix requires a more powerful hardware configuration. It will work in large mainframe computers but will not work in an x86 based personal computer. Linux however, (which is built on the concept of Unix) has small hardware requirements and it will work on both a large mainframe computer and an x86 based personal computer. 

Unix is an Operating System developed in olden days in which the kernel, the heart of the OS, interacts directly with the hardware. (note: this is the definition of what a kernel is). Because UNIX treats everything as a file, it provides greater security for users. An example of a UNIX distribution is posix. (note: actually POSIX is a set of standards for interoperability of applications between UNIX and UNIX-like systems). Linux uses a the UNIX architecture as its basis and provides more facilities and applications. Linux could be considered to be a GUI to the UNIX core. (note: this is plain wrong. GNU/ Linux was rewritten from scratch using UNIX as a guide. GNOME and KDE are GUIs for GNU/Linux). Examples of Linux distributions are Redhat, Fedora, Susee, Mandriva, and Ubuntu. Solaris OS also uses the UNIX kernal almost all UNIX commands will work on solaris in addition to 500 Solaris specific commands. (note: Solaris is also a rewrite of UNIX for x86, and does not use any original UNIX code). Both UNIX and LINUX are Open source. (note: UNIX is proprietary, Linux is open source) 

Unix is the foundation for a number of operating systems, with Linux being the most popular one. Novell and Free BSD are 2 other commonly used Unix varients.(note: Again, the BSD family are based on another rewrite of UNIX for x86, UNIX is not their foundation in the sense implied here) 

UNIX is an operating system created in the early days of computers. More recently, Linux was created as an open-source, freeware operating system. (note: Linux is free software, not freeware. Free software is open source that insists any developer reusing code releases their own work as free software. Freeware is proprietary software distributed at no cost [gratis]) It is "UNIX-LIKE", meaning that it uses many UNIX constructs but also departs from traditional UNIX in many ways. Like UNIX, Linux is faster than many of the other commercially available operating systems. (note: This is a sweeping generalization and depends on the hardware used, and what servers and applications are running) It appears to also be far more robust than any of the Microsoft products. Linux is being used in many time critical applications because of it's speed. It is also used in many applications that need to maintain uptime because Linux, like UNIX, can run for months at a time without rebooting. While the typical method of solving Microsoft problems is to "reboot", that particular requirement does not seem to be appropriate in a Linux/Unix environment. While UNIX has created a windows-like work environment, Linux has improved greatly on that concept. Linux has become a real player in the consumer operating system market... and it's free. While you may want to pay for a Linux distribution, the actual code is free and you are allowed to load it on as many machines as you want. You can get Linux for free if you wish to load it across the internet. 

Posted on 12:46 AM by Unknown

3 comments


Introduction

The make program essentially is used to update targets (exe or object files) according to the dependency instructions, typically present in a file called makefile. The program automatically can link dependent modules and also decide which files are to be (re)compiled by looking at the object code timestamps. Essentially make allows the compilation process to be a breeze.

Makefile Description

The makefile contains all the dependency information required for compiling. The file is typically denoted as makefile or Makefile. This however can be overridden by specifying the file name with the -f switch. The instructions are written in single lines and interpreted accordingly. A backslash (\) can be used to signify continuation of the line.

The target is the final output that is required at the end of the make process. It typically is reliant on many other files to have compiled successfully. Target compilation are carried out by a series
of actions called as command. Rule can be composed of multiple commands but each starting with a tab character.

Makefile has the feature of using variables, like in other programming languages. A variable is defined as:

variable_name = variable_definition
$(variable_name) is used to use its value.

Also like C/C++ make has the capability of including files by:
Code:
include file_name


Make software also has set of internal macros:

$+
List of all the defined dependencies, space separated, with duplicates

$^
List of all the defined dependencies, space separated, without duplicates

$@
Contains the name of the current target

$<
Current prerequisite modified later than the current target


Make Options

The makefile typically has the contents are specified below:

Empty Lines

Lines with no text are ignored
#
Pound acts as a start of comments (single-line) indicator

Dependencies

targets: dependency; commands

Here the targets and their dependencies are specified. If the dependent files have not been created or a newer version of their source code exists, then the files are regenerated. These can be followed by one or more commands. If there are no dependencies then the commands are executed always.

Other Options

-f makefile
The specified makefile is used as the description file

-h
Print the help information

-i
Ignore any errors

-n
Prints the command that will be executed. For testing the flow of the compilation process.

-q
Returns 0 if the target file is up to date; non-zero if otherwise

-p
Prints out the variables and settings existing by default

Running Make

Now to put all the above options to use. We will build a descriptor file to build an exe called sampleexec. Also assume that it needs two source files src1.c and src2.c. To build a descriptor for this and save it in a file called makefile.

The makefile will look like this
Code:
sampleexec : src1.o src2.o
gcc -o sampleexec src1.o src2.o
src1.o : src1.c gcc -c src1.c
src2.o : src2.c
gcc -c src2.c

To compile just run:
Code:
# make 

Steps make takes to compile sampleexec:

  • Sees that sampleexec depends on the object files src1.o src2.o
  • Looks for the target definition of the two object files.
  • Sees that src1.o depends on the file src1.c
  • Executes the commands given in src1.o's rule and compiles src1.c to get the object file.
  • Similarly looks at the target src2.o and compiles the object files
  • Prepares sampleexc by combining the two object files
This way any changes to the project can be done just to one file. This way errors and rework is reduced by a lot.

Conclusion

Thanks for visiting my blog ! I hope this article helped you !

Posted on 9:07 AM by Unknown

1 comment


  • Linux is free, but a Windows License costs 100$ +
  • 95% of the softwares in Linux are free; in Windows you have to buy the full version.
  • Linux distributions use less RAM than Windows
  • Linux is more secure than Windows
  • here is 0.01% possibility of getting infected with a virus in Linux, but in Windows the possibility is way bigger.
  • You can find a solution for everything in Linux, within few hours , by posting your problem to their forums (For example: askubuntu.com), meanwhile in Windows you have to wait for the update.
  • Linux is Faster than Windows
  • There are hundreds of programming modules and libraries pre installed in Linux, but in Windows you have to install them automatically.
  • In windows you have to google in order to get to the download link of a specific software, meanwhile in Linux you have all the softwares you need in one place: Software Repositories
  • There are more then 500 Linux Distribution from which you can choose from, but there are very few Windows OS-s (Vista, 7, 8)

Posted on 9:03 AM by Unknown

No comments


Today i am going to post how to hack wifi using hydra password cracker by the requesting on our user Leaving your wireless router at its default settings is a bad idea. The sad thing is, most people still do it. Once they've penetrated your network, hackers will change your router settings so they'll have an easy way back in. This allows them to change your network into a shell or proxy so they can forward their traffic anonymously through you when committing other dirty deeds.

If you keep your wireless router at the defaults, then hackers can control your firewalls, what ports are forwarded, and more.

But never mind the hackers, what about your kids?

In this Null Byte, we're going to take a hack at our own wireless routers to see just how secure they really are. We'll be using Arch Linux and THC Hydra, a brute-forcing tool. Windows users, you can follow along if you use Cygwin.

Step 1 Download & Install Hydra
First we need to go to the Hydra website, download Hyrda, and get everything configured. In this article, a "cmd" refers to a command that has to be entered into a terminal emulator.

Download Hydra from THC's website.
Extract Hydra in a nice location.
cmd: tar zxvf hydra-7.1-src.tar.gz
Change to the newly made directory.
cmd: cd <new directory>
cmd: ./configure
cmd: make
cmd: sudo make install
Step 2 Use Hydra on Your Router
Now we're going to attack our routers. The default IP/URL to reach it at will be 192.168.1.1, so test that address in a browser to confirm it. If you get a dialog box, you've reached your router. This is running HTTP basic authentication.


Commands & Configuration
cmd: xhydra
Enter 192.168.1.1 as your target.
Use http-get as the method.
Port 80.
Pick a word list saved on your computer.
Click start!

and hydra start carcking password
note: user it may take 1 or 2 or 3 day or it may take months
to crack on the behalf of password if pass word is like this (ABcD12AcD345) <--- mean if pass have uper and lower latters so his can take months and is pass like this (abcdefg) or (welcome) or (helloworld) it take 10 to 20 minits to crack

Note: you can download hydra and its password list from google in free . you just Google it to find them.


DONE IT !!!

If you have any question about it then , you can comment below and i will reply to your comment.
please note that this tutorial for only educational purpose only.

Posted on 7:48 AM by Unknown

2 comments

This guide is for penetration testing your own network or someone else's, with permission
using someone elses wifi is theft of service and may or may not  be a criminal offence in your area
Logan nor anyone from tek syndicate is liable for your actions, you are so proceed with caution!
EDIT; kali linux is now out as logan said on the tek a few weeks back, as kali is built from the same tools by the same team this guide work with both BT5 r3 and kali,

1st step you will need a copy of backtrack 5 so go here http://www.backtrack-linux.org/downloads/
or kali linux from here (guide is same for both) http://www.kali.org/downloads/
and get yourself an iso (32 or 64bit depending on your hardware)
either burn to disc using imgburn http://www.imgburn.com/index.php?act=download
or make a live usb of 4gb + then you can save sessions and not have to start over when you power off, its a good idea as i have had attacks take up to a day and a half (because of weak signal) and with a disc once powered down......
to do this i use this http://www.pendrivelinux.com/universal-usb-installer-easy-as-1-2-3/ itll do windows too....
or as a third option you could run it as a virtual machine with vmware from within windows, but if you do that you HAVE to use a usb wifi dongle because the internal wifi card of laptops gets seen as ethernet by the guest os, dont know why but i have found it to be true - vmware is not freeware, there maybe a trial or cripple ware version available here  http://www.vmware.com/uk/ but i sailed away from the pirate bay with my copy, i wont link directly to it as i may get in trouble from logan but you're a smart guy you can find it ;)
ok so now you have a disc/usb or virtual machine so power on, into BIOS (del,f11,f2 another key depending on hardware) and set it to boot from disc or usb, (not applicable to vm) and lets have some fun!
when the first menu comes up you want default text mode
when the cursor becomes available type "startx" without the quotes and it will boot into a desktop
go to the top of the screen and click on the little black screen to open a teminal (looks like a windows cmd window)
now to find out what wifi adaptor you have
type "airmon-ng" no quotes
if it doesnt list anything then your wifi adaptor is not compatible with bt5 it probably has no promiscuous mode or is lacking driver support but most laptop internal wifi i have found to work and most full size usb dongles do too the tp link tl wn821n works for definate.
the output from that is normally wlan0 but if you have multiple adaptors you will get more options
type "airmon-ng start wlan0"
assuming wlan0 was the output from previous command if not put what the output was for the adaptor you would like to use it will output monitoring enabled on mon0 most times unless you have multiple adaptors
so now we have set our adaptor to monitor the airwaves we can have a snoop at all the available networks 
type "wash -i mon0"
and it will list all available networks signal strength encryption type bssid's and other things, we are looking for networks with wpa2/psk WEP is also dooable and much quicker, but as a security standard it is dead and not in common use any more but if you would like a guide for that too, let me know in the thread and when i have a moment.....
anyway choose your victims bssid and
type "reaver -i mon0 -bBSSIDGOESHERE -vv" 
and it will start running through the all the possible wps set up pins randomly, it maybe that you get ap rate limiting detected, this is where a router recognises that it is getting attacked from all the wrong passwords and stops bt5 from accessing it rfor a set amount of time to combat this youi need to add a delay -d command to the reaver command line so it looks something  like this
"reaver -i mon0 -b21.34.56.23.54 -d20 -vv" 
if ap rate limiting still detected keep increasing the delay by 5 seconds untill you stop tripping the ap rate limit
by using the -vv comand you get more verbose output from the termional wich allows you to see if it is channel hopping or ap rate limiting or whatever and it also lets you see when it gets caught in a loop on a particular password when this happens i press cntrl+c to stop session then up cursor for last command and enter and it picks up where it left off and normally carries on without stuttering on the same password again
after time passes it will output the password and pin number copy both down as if the password is changed you can run the reaver command line again with a -pPINHERE and it will break new password in less than a minit as the pin doesnot change this would look like
"reaver -i mon0 -b23.56.76.45. -p123456 -vv"
the password will get changed if your found on a network you are not supposed to be on wich is why i put that command there as i have had it happen a few times
if this goes on and the network admin is savvy they may stop changing the password and start banning mac addresses from connecting to the router but dont fear!
i use this http://www.technitium.com/ to change my mac address as i have had to deal with this problem before
as a side note, if you are going to jump on a network that isnt yours change your pc name to something not identifiable to you mine is called vm.lineupdate32 as the target network is on virgin media....see?
anyway happy hacking, any questions just stick them below and ill answer as best i can, as always if you like it like it!

Posted on 8:47 AM by Unknown

3 comments

Today, I'm going to guide you step by step to install Kali Linux in windows using virtual machine. Kali Linux is the best OS for penetration testing. Kali Linux is a Debian-derived Linux distribution designed for digital forensics and penetration testing. Kali has many advantages over the BackTrack. It comes with many more updated tools. The tools and streamlined with Debian repositories and synchronized four times a day. That means users have the latest package updates and security fixes. So now moving on to article i.e "How To Install Kali Linux/Backtrack On Windows [Step By Step Guide]"

How To Install Kali Linux/Backtrack On Windows :


Requirements :-

  • A minimum of 8 GB disk space for the Kali Linux install.
  • For i386 and amd64 architectures, a minimum of 512MB RAM.
  • Download Kali linux ISO. [ Link ] 
  • Download VMware [ Link ]

Steps To Perform :-

Step 1: First of all install and open VMWare Workstation which you can downloag from the above provided link and  after opening VMWare click on Click a New Virtual Machine. It will open New Virtual Machine Wizard.

Step 2: Now in the opened wizard select I will install the operating system later and the click onNext.

Step 3: In the next opened window select Guest operating system as Linux and then select Version as Ubuntu. Click on Next to goto next screen.


Step 4: Now type virtual machine name and specify the location where you want install Kali Linux.
Step 5: Now specify the disk capacity. Default is 20 GB. Select Split virtual disk into multiple filesand Click on Next.


Step 6: On next screen, either you can click on Customize Hardware to customize settings and then to go to step no. 8 or click on Finish to complete the process of creating virtual machine.
Step 7: Click on Edit virtual machine settings.

Step 8: This is the screen where you can customize or edit your Hardware Settings. As mentioned above, the minimum system requirement is uni-processor of i386 or amd64 architecture processor, so click on 

(a) Memory, to select minimum 1024 MB of RAM.
(b) Processors, as 1 or 2 (depending upon the processing speed) and Preferred mode as Automatic.
(c) Click on CD/DVD IDE. Now, on right hand panel you will Connection. It has two options : 
  • Use physical drive- select this option if you have Kali Linux is in your CD or DVD drive.
  • Use ISO image file- select this option if you have downloaded Kali Linux on your hard drive. Click on Browse to locate the ISO file. 
(d) Floppy drive is optional, as now a days most of the computers do not floppy drive.
(e) Select NAT if you have network adapter for Internet.

Now just click on OK.

Step 9:  Select kali linux on left side panel screen and then click on Play virtual machine.

Step 10: Now the VMWare setup will startup. Wait until it loads.

Step 11: Now the Kali Linux boot screen will appears. Choose either Graphical or Text-Mode install and press Enter to boot. Here I'm choosing Graphical Mode.

Step 12: After selecting your preferred language click on Continue.

Step 13: Select your location and click on Continue.

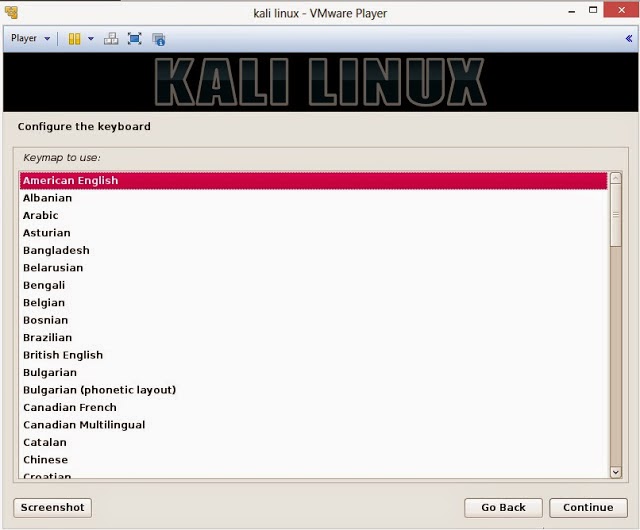
Step 14: Now select option to configure your keyboard and click on Continue.

Step 15: Once disc is detected by operating system, it will copy the image to your hard disk and probe your network interfaces.


Step 16: Now the next step is to enter the hostname to configure your network and click onContinue.

Step 17: If you have a domain name, then enter here in the box.You can enter the domain name later and leave this box blank. Click on Continue.

Step 18: Now enter any password for your root account.

Step 19: Kali will auto-detect time from your network time server.

Step 20: Now the next step is of partitioning the disk. Beginner can select Guided- use entire disk however experienced user can setup partition as Manual.

Step 21: Below are the screenshots of manual partition. I have created three partitions
  •  /boot (a partition from where your operating system will boot)
  • / (root partition for super user or admin)
  • swap (a portion where buffering is done)


Step 22: Now this is the screen where you will have last chance to review your disk configuration before the installer makes irreversible changes. After you click Continue, the installer will go to work. You are almost done.


Step 23: Configure network mirror to give additional software that is included on the CD-ROM and leave HTTP Proxy.


Step 24: Now just install the GRUB boot loader.


Step 25: Finally, click on Finish to reboot Kali Linux installation.

Step 26:  You are done ! Now the Login screen of Kali Linux will appears on the screen and login using your password which you made earlier.


So, this is "How To Install Kali Linux/Backtrack On Windows". I hope this helped you a lot. If you are facing any problem just comment it below. Fell free to share. More You Share, More We Will Share For You. Thanks !!

Posted on 4:55 AM by Unknown

1 comment